
Main Courses
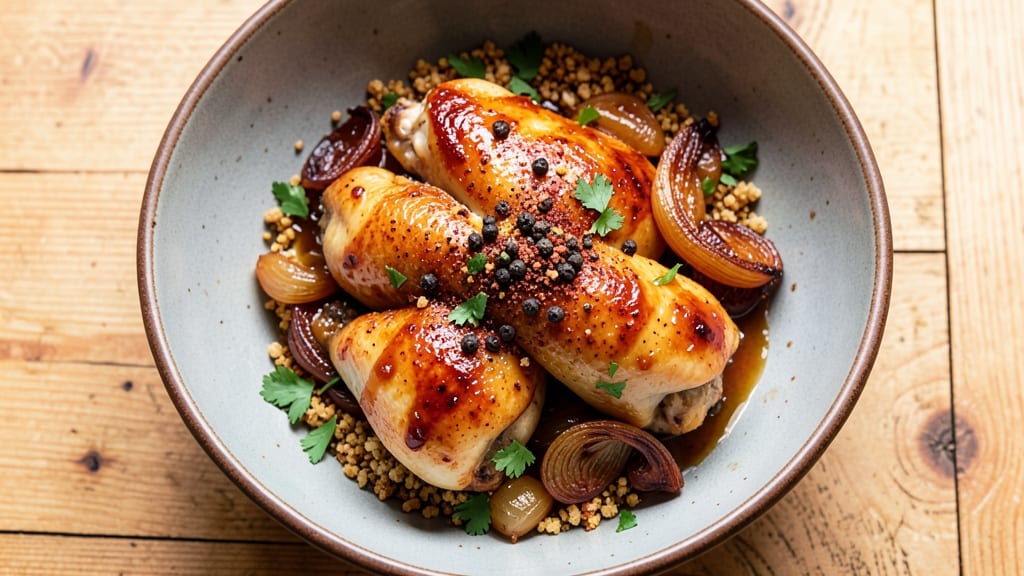
Grandma's chicken recipe is the kind of homestyle dish that transforms a simple weeknight into a celebration—crispy golden skin that shatters with every bite, juicy meat so tender it falls apart at the touch.
This is the recipe I grew up with, passed down through generations, where every ingredient plays its part in creating comfort that tastes like home. The secret lies in the slow-cooked seasoning and the perfect balance of heat and moisture that keeps the chicken succulent.
What makes this recipe special is how it honors tradition without requiring fancy techniques. You'll start with a simple brine that tenderizes the meat from the inside out, then build layers of flavor with a dry rub that crisps beautifully.
The result is chicken that's crispy on the outside, juicy on the inside, and infused with just the right amount of warmth from spices that feel like a hug. It's the kind of dish that feeds a crowd but still feels personal, like it was made just for you.
By the time you pull that chicken from the oven, your kitchen will smell like Sunday dinners and childhood memories. The skin will be golden and crackly, the meat will pull apart easily, and every bite will carry that perfect harmony of savory, smoky, and slightly sweet notes.
This is the recipe that brings people together—whether it's for a family gathering or a quiet night in with loved ones. Let's get started on making it your own.
This dish pairs beautifully with classic sides like buttery mashed potatoes, fluffy cornbread, or a fresh garden salad. The leftovers reheat just as well as the first serving, making it perfect for meal prep or feeding a hungry house.
The beauty of this recipe is in its versatility—simple enough for weeknights but impressive enough for company. It's the kind of meal that becomes a tradition in your own home.
Ingredients for grandma's chicken
These homestyle ingredients create crispy skin and juicy meat that taste like Grandma's love.
| Ingredient | Amount | Notes |
|---|---|---|
| Chicken Thighs 🍗 | 2 ½ lb | Bone-in, skin-on for crispiness |
| Kosher Salt 🧂 | 1 ½ tbsp | For brining and seasoning |
| Brown Sugar 🍯 | ½ cup | Light or dark preferred |
| Black Peppercorns 🌶️ | 1 tbsp | Freshly cracked for best flavor |
| Garlic Powder 🧄 | 1 tbsp | Not garlic salt |
| Smoked Paprika 🌶️ | 1 tbsp | For that smoky hug |
| Dried Thyme 🌿 | 1 tsp | Or 1 tbsp fresh thyme |
| Olive Oil 🫒 | ½ cup | For crispy skin |
| Butter 🧈 | ¼ cup | Unsalted, cold for frying |
| Lemon Juice 🍋 | 2 tbsp | Freshly squeezed |
| Fresh Rosemary 🌿 | ½ tsp | Chopped, stems removed |
| Water 💧 | 4 cups | For brining |
The chicken thighs are the star—bone-in, skin-on gives you that legendary crispy skin. Walmart or Costco usually have them pre-cut, but if you're buying whole, look for thighs with good marbling. I always grab extra because they disappear fast. The thighs should be plump and firm, not shriveled. For the brining, use Diamond Crystal kosher salt—it dissolves better than table salt, and you can find it at any grocery store. The brown sugar adds just enough sweetness to caramelize that skin, so don't skip it. Freshly cracked black peppercorns? Worth the minute it takes to crush them in a mortar—so much better than pre-ground.
No smoked paprika? Regular paprika plus a pinch of liquid smoke works in a pinch. Fresh thyme is ideal, but dried at one-third the amount gets you close. The olive oil matters here—use something with a high smoke point, like Avocado oil if you're frying. Butter is non-negotiable for crispiness—European-style unsalted butter melts better, but any butter works. Want more flavor? Add a splash of apple cider vinegar to the brine. The lemon juice brightens everything up, so don't use bottled—fresh is key. And if you're short on rosemary, fresh sage works too.
This chicken reheats like a dream—oven at 350°F for 20 minutes keeps it crispy. Store leftovers in the fridge for up to 4 days or freeze for 3 months. I always make a double batch because it's that good. The skin stays crispy if you reheat it covered with foil first, then uncovered to crisp again. And trust me, the leftovers are even better the next day—all those flavors meld together like a cozy hug.
Why You'll Love This Recipe
- Five-Ingredient Magic: I swear, this recipe is the kind of thing you’ll make without even looking at the list. Brown sugar and peppercorns? That’s it for the real work—just toss those on the thighs with garlic powder and salt, and the oven does the rest. No chopping, no fuss, just pure, hands-off satisfaction.
- Sweet-Savory Crunch: The brown sugar caramelizes into this irresistible crust while the peppercorns add a subtle, warm bite. Honestly, the first time I bit into one, I nearly dropped the fork—it’s that good. The garlic powder ties it all together without overpowering, like a hug for your taste buds.
- Weeknight or Weekend: Between us, this is the dish I serve when I’m too tired to impress but still want to feel like I did. Doubles easily for a crowd, reheats like a dream, and even my picky teenager doesn’t complain. (Yes, even on a Tuesday night.)
- Budget-Friendly Leftovers: Chicken thighs are cheap, and this recipe stretches them further than you’d expect. I make a big batch on Sunday, and by Wednesday, I’m still pulling them out for lunches—no one skips seconds. Plus, the flavors only get richer the next day. My secret weapon for lazy days.
Step-by-step instructions for grandma's chicken recipe
This homestyle method delivers restaurant-quality crispy skin and melt-in-your-mouth juicy meat every time.
Make the Brine for Maximum Flavor
In a large bowl, combine the 4 cups water and all 1.5 tablespoons kosher salt until completely dissolved. This creates a flavorful brine that ensures juicy meat and crispy skin. Add the 2.5 pounds chicken thighs, making sure they're fully submerged. Place the bowl in the refrigerator and let them brine for at least 4 hours or overnight - the longer they soak, the more flavorful they'll be.
Here's the thing - don't skip this step. The salt breaks down the muscle fibers, allowing them to hold onto moisture during cooking. After brining, pat the chicken thighs completely dry with paper towels. This drying step is absolutely critical for crispy skin because any moisture left on the surface will steam instead of crisp up in the pan.
Create the Dry Rub for Perfect Seasoning
In a small bowl, mix together the 0.5 cup brown sugar, 1 tablespoon garlic powder, 1 tablespoon smoked paprika, 1 teaspoon dried thyme, and 0.5 teaspoon chopped fresh rosemary. I like to use my hands to work the spices into the brown sugar until it's evenly distributed - this helps the rub stick better to the chicken. Add the 1 tablespoon freshly cracked black peppercorns and mix again.
Once your dry rub is ready, generously coat each chicken thigh with it, pressing it into the skin so it adheres well. The brown sugar will caramelize during cooking, creating that beautiful crust we're after. Let the seasoned chicken sit at room temperature for 30 minutes before cooking - this ensures even cooking from start to finish.
Cook the Chicken to Crispy Perfection
Heat a large oven-safe skillet over medium heat. Add the 0.5 cup olive oil and let it get hot but not smoking - you want it shimmering but not burning. Carefully place the chicken thighs skin-side down in the hot oil. Here's where it gets exciting - let them cook undisturbed for 8-10 minutes until the skin is golden brown and crispy.
Once the skin is crispy, flip the chicken thighs and add the 0.25 cup cold butter to the pan. The butter will melt and baste the chicken, adding incredible flavor. Transfer the skillet to a preheated 375°F oven and bake for 25-30 minutes, or until the internal temperature reaches 165°F and the juices run clear. The butter basting is what makes this recipe taste like grandma's kitchen!
Finish with Bright Citrus and Rest
Remove the chicken from the oven and let it rest for 5 minutes. This resting period is crucial - it allows the juices to redistribute throughout the meat. While the chicken rests, pour the 2 tablespoons lemon juice into the pan and scrape up all those delicious browned bits from the bottom. This creates a quick pan sauce that will take your chicken to the next level.
Serve the chicken immediately, spooning that bright lemon sauce over each piece. The crispy skin should crackle when you cut into it, revealing juicy meat underneath. Each bite should deliver perfect balance - crispy, juicy, and packed with smoky, herby flavor. Trust me, this is the kind of chicken that makes people ask for seconds!
Pro Tips For Making Grandma'S Chicken
- CRACK THE SKIN FIRST: Pat the chicken thighs dry, then score the thickest part of the skin in a crosshatch—this lets the brown sugar and spices cling better and renders fat faster. I learned this the hard way after my first batch turned greasy instead of caramelized. Use a sharp knife, not a dull one.
- SALT THE THIGHS 40 MINUTES EARLY: Toss the raw thighs with salt before you even think about cooking—let them sit uncovered in the fridge while you prep everything else. The salt breaks down the proteins, making the meat juicier and the crust stickier. (Yes, even if you're impatient like me.)
- USE COARSE GARLIC POWDER: Skip the fine stuff—coarse garlic powder clumps less and dissolves slower, giving you that actual garlic flavor instead of just a dusty aftertaste. I was skeptical until I tried it; now I won’t go back. Store it in a jar away from light, or it’ll lose potency faster.
- BASTE WITH THE FAT: After the thighs brown, pull the pan off heat and spoon the rendered fat over them every 5 minutes—it’s like liquid gold for crispiness. I used to ignore this, and my crust was always sad. Do this for the last 10 minutes, and you’ll get that sticky, glaze-like finish grandma’s recipe promises.
Regional styles of grandma's chicken
Southern Fried Tradition
This is the way I learned to make fried chicken back in Georgia—crispy skin so golden it cracks like autumn leaves, and meat so tender it melts in your mouth. The secret starts with buttermilk brine (not just saltwater) that tenderizes the chicken overnight.
I use whole buttermilk—the fat adds richness, and the acidity breaks down those muscle fibers beautifully. After brining, I double-dip the chicken in flour mixed with cayenne and paprika for that signature Southern crunch. 🍗
Texas-Style Smoky Crisp
Out west, they take fried chicken to another level with a smoked paprika and brown sugar dry rub before frying.
I've seen pitmasters in Texas use a cast-iron skillet over pecan wood for that smoky aroma—you can mimic this at home by adding ½ teaspoon liquid smoke to your flour mixture. The result?
A chicken so flavorful it tastes like it's been slow-smoked, but with all the crispy goodness of deep-frying. Serve it with white bread and pickles for the full Texas experience.
Midwest Pan-Fried Comfort
In the Midwest, they swear by pan-fried chicken—no deep-frying needed. Start with bone-in, skin-on thighs (like the recipe calls for), then sear them in a cast-iron skillet with butter and olive oil until the skin is golden.
The key here is low-and-slow cooking: after searing, finish in a 350°F oven for 20-25 minutes until the internal temp hits 165°F. The skin stays crispy, and the meat stays juicy. Midwesterners love this method because it's healthier (less oil) but still delivers that homestyle crunch. 💛
Charleston Lowcountry Style
Down in Charleston, we take our fried chicken with a sweet-and-spicy twist. After frying, we toss the chicken in a sauce made with honey, hot sauce, and a splash of apple cider vinegar.
The heat comes from pen cap hot sauce (a local favorite), and the sweetness balances it perfectly. I like to add a pinch of cayenne to the flour mixture before frying for extra kick.
Serve it with collard greens and cornbread for a true Lowcountry feast—this is the kind of chicken that makes people line up at food trucks.
New England Butter-Basted Beauty
Up north, they focus on butter basting to keep the chicken juicy while achieving that crispy skin. After frying, they baste the chicken with melted butter while it rests—this is what gives New England fried chicken its legendary richness.
I've seen chefs use European-style butter (like Plugrá) for the best flavor. The other trick? Double-frying: fry the chicken once to render the fat, then fry again after resting to lock in that crispiness. Pair it with apple sauce or steamed cabbage for a classic New England combo.
Grandma's Leftovers Hack
No matter the regional style, leftovers are where the magic happens. In my grandma's house, we'd reheat fried chicken in the oven at 350°F for 10 minutes—just enough to warm it through without making the skin soggy.
The real trick? Re-crisp the skin by tossing the chicken in a hot skillet for 30 seconds per side after reheating. This works for all regional styles, whether it's Southern, Texas, or New England. 🔥
Nutrition facts
Frequently asked questions
Can I use chicken breasts instead of thighs for this recipe?
Thighs are ideal because they stay juicy and have more flavor, but you can use breasts if you prefer. For best results, brine them 1 hour max (not overnight) and cook at 350°F for 15-20 minutes after searing. The skin won't be as crispy, but the meat will still be delicious.
Why does my chicken skin keep coming out soggy instead of crispy?
Soggy skin usually means moisture wasn't fully dried before cooking or the oil wasn't hot enough. Always pat thighs very dry with paper towels after brining, and heat the oil until it shimmers (around 350°F). Cook undisturbed for 8-10 minutes to build that crust. If using a skillet, make sure it's oven-safe to finish cooking.
Can I make this recipe ahead of time for a gathering?
Cook the chicken up to 2 days ahead, then store in an airtight container in the fridge. Reheat in a 350°F oven for 10 minutes, then re-crisp in a hot skillet for 30 seconds per side. The flavors actually improve overnight as they meld together.
What's the best way to reheat leftovers without losing crispiness?
Use the two-step method: First, warm in the oven at 350°F for 10 minutes (covered with foil) to heat through gently. Then, transfer to a hot skillet for 30 seconds per side to restore that golden crunch. Never microwave—it makes the skin rubbery.
Can I substitute any of the spices if I don't have them?
Yes! For smoked paprika, use regular paprika + ¼ tsp liquid smoke. Skip brown sugar? Add 1 extra tbsp olive oil for crispiness. No thyme? Oregano or sage works. The key is balancing flavors—adjust to taste. Fresh herbs are best, but dried spices (at half the amount) work in a pinch.