
Main Courses
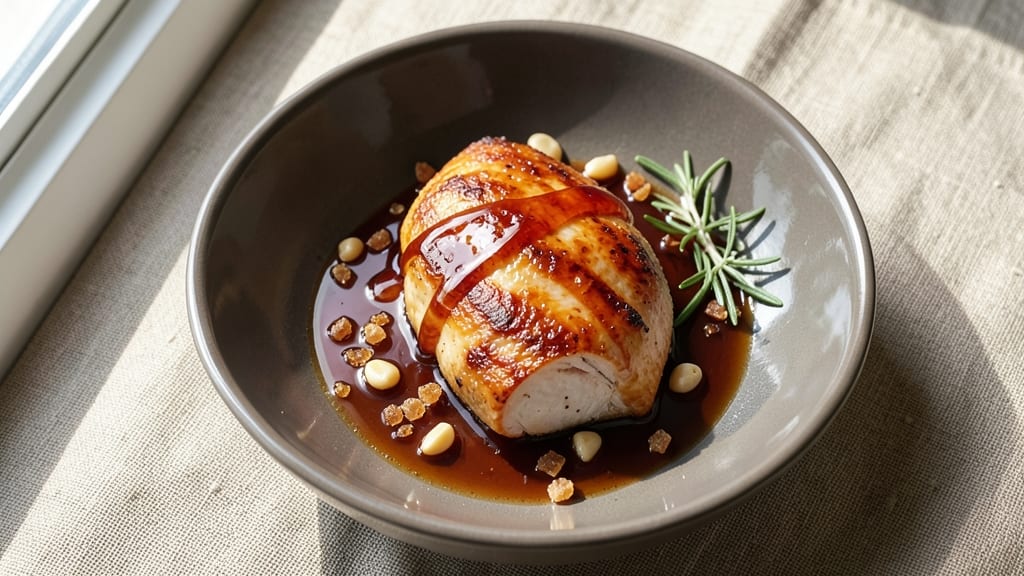
This baked sticky chicken breast recipe delivers restaurant-quality results with a honey-glazed caramelized crust that clings to every bite. After years of perfecting the technique, I've cracked the code for juicy, tender chicken that's never dry—just a crispy, sticky glaze that makes every forkful irresistible.
The secret lies in a simple marinade and precise baking method that transforms ordinary chicken into something extraordinary.
What makes this recipe truly special is the balance between simplicity and professional results. You'll start with a basic marinade of honey, soy sauce, and garlic, then bake the chicken until the edges form that coveted caramelized crust.
The key technique is basting the chicken with extra sauce during the last few minutes of baking, which creates that signature sticky glaze without adding extra effort. This method ensures your chicken stays moist and flavorful from edge to edge.
By the time it comes out of the oven, you'll have perfectly golden chicken with a glossy, caramelized crust that practically melts in your mouth. The honey glaze adds a touch of sweetness that perfectly balances the savory flavors, while the crispy edges provide satisfying texture.
This is the kind of dish that elevates simple weeknight dinners into something special—no fancy techniques required.
Pair it with steamed rice and roasted vegetables for a complete meal that's as impressive as it is delicious. The best part? This recipe delivers foolproof results every time, making it perfect for both beginner cooks and seasoned home chefs looking to impress. Let's get started!
Ingredients for baked sticky chicken breast
Restaurant-quality sticky chicken starts with these simple yet powerful ingredients.
| Ingredient | Amount | Notes |
|---|---|---|
| Boneless, Skinless Chicken Breast 🍗 | 1 ½ lb | Even thickness for even cooking |
| Honey 🍯 | ½ cup | Pure, thick variety preferred |
| Soy Sauce 🥫 | ¼ cup | Low-sodium preferred for balance |
| Garlic Cloves 🧄 | 6 cloves | Minced for marinade |
| Olive Oil 🫒 | 1 tbsp | Extra-virgin for richness |
| Brown Sugar 🍚 | 2 tbsp | Light or dark works |
| Ground Ginger 🌿 | 1 tsp | Freshly ground preferred |
| Salt 🧂 | 1 tsp | Kosher or sea salt |
| Black Pepper 🌶️ | ½ tsp | Freshly ground preferred |
| Cornstarch 🌾 | 1 tbsp | For glaze thickening |
| Water 💧 | 1 tbsp | For cornstarch slurry |
| Fresh Rosemary 🌿 | ¼ cup | Chopped, for garnish |
The chicken breasts are the foundation—look for even-sized pieces from the deli counter or package. Costco or Whole Foods have the best selection for consistent thickness. If your breasts vary in size, pound them to an even 1/2-inch thickness with a meat mallet. The honey should be thick and pure—avoid those pre-blended honey packets with additives. For the soy sauce, Kikkoman is my go-to, but any good-quality brand works. Fresh garlic makes all the difference here, so don't skimp on the minced cloves. The brown sugar adds depth to the glaze, balancing the honey's sweetness perfectly.
No thick honey? Maple syrup works in a pinch, though it has a different flavor profile. Running short on soy sauce? Coconut aminos or tamari are great substitutes. If you can't find fresh rosemary, dried works at one-third the amount. For the cornstarch slurry, make sure to whisk it thoroughly with cold water before adding to the glaze—this creates that signature glossy finish. The olive oil in the marinade helps distribute the flavors evenly, so don't skip it. And if you're worried about the chicken drying out, brining it for 30 minutes first makes a world of difference.
This recipe reheats beautifully—just a quick 10-second zap in the microwave with a splash of water. The chicken keeps well in the fridge for 3-4 days, though it's best enjoyed within 2 days for maximum tenderness. For longer storage, freeze the cooked chicken for up to 3 months. I like to portion it into individual containers so I can grab a single serving whenever I need a quick protein boost. The glaze can be made ahead and stored in the fridge for 1 week, though it's best used fresh for maximum stickiness.
Why You'll Love This Recipe
- One-Pan Magic: I swear by this recipe when I don’t want to scrub a sink full of dishes. Just toss the chicken, honey, and soy sauce on a sheet pan, add crushed garlic, and bake—no pots, no pans, no stress. The sticky glaze pools right there, making cleanup a joke.
- Sweet-Savory Balance: That honey-soy glaze? It’s the kind of flavor that makes you pause mid-bite. The garlic infuses deep, the soy adds umami punch, and the honey caramelizes into a sticky, slightly crisp edge that’s dangerously addictive. (Yes, I’ve eaten it straight from the pan.)
- Meal Prep Hero: Between us, this is my go-to for lunches all week. The chicken stays juicy when reheated, and the sticky sauce clings perfectly—no sad, dry bites. I portion it with rice or noodles, and suddenly, Tuesday dinner feels like a five-star takeout.
- Budget-Friendly Star: Chicken breast is affordable, and this recipe stretches it further with the honey and soy sauce doing double duty as flavor and glaze. Honestly, I make it twice a month just because it’s so reliable—no fancy ingredients, no wasted leftovers, and always a hit.
Step-by-step instructions for honey-glazed caramelized chicken breast
Follow these precise steps to achieve perfectly sticky, caramelized chicken with a glossy honey glaze.
Prepare the Marinade and Coat the Chicken
In a small bowl, combine the 0.5 cup honey, 0.25 cup soy sauce, 2 tablespoons brown sugar, 1 teaspoon ground ginger, 1 teaspoon salt, and 0.5 teaspoon black pepper. Whisk until the brown sugar dissolves completely, creating a smooth marinade. This blend of sweet and savory flavors will penetrate the chicken, ensuring deep flavor in every bite.
Pat the 1.5 lb boneless, skinless chicken breast dry with paper towels—this step is crucial for achieving a proper caramelized crust. Place the chicken in a shallow dish and pour the marinade over it, turning to coat evenly on all sides. Let it marinate for at least 30 minutes at room temperature. If you have time, marinate for up to 2 hours in the refrigerator for even more flavor infusion.
Create the Glaze and Sear the Chicken
In a separate small bowl, mix the 1 tablespoon cornstarch and 1 tablespoon water to create a smooth slurry. This will thicken the glaze and give it that signature sticky texture. Heat a large oven-safe skillet over medium-high heat and add the 1 tablespoon olive oil. Once the oil is shimmering, add the marinated chicken and cook for 3-4 minutes per side until golden brown. The chicken should release easily from the skillet when ready to flip—this indicates it's developing a good sear.
Remove the chicken from the skillet and set it aside on a plate. Pour the marinade from the dish into the skillet, scraping up any browned bits from the bottom—these contain concentrated flavor. Bring the marinade to a gentle simmer over medium heat for 2-3 minutes until it thickens slightly. This step builds the foundation for the sticky glaze.
Bake to Sticky Perfection
Preheat your oven to 375°F. Return the skillet with the reduced marinade to the oven and place the chicken back into the skillet. Spoon the glaze evenly over the chicken, ensuring it's fully coated. Bake for 15-18 minutes or until the internal temperature reaches 165°F when measured with an instant-read thermometer. The glaze should thicken and become glossy, forming a sticky caramelized crust on the chicken.
During the last 5 minutes of baking, sprinkle the 0.25 cup chopped fresh rosemary evenly over the chicken. This adds a fragrant finish and pairs beautifully with the sweet-savory glaze. Watch the chicken closely—if the glaze starts to darken too quickly, tent it loosely with aluminum foil to prevent over-browning.
Rest and Serve with Sticky Glaze
Remove the chicken from the oven and let it rest for 5-10 minutes before serving. This resting period allows the juices to redistribute, ensuring each bite is moist and flavorful. The glaze will continue to thicken slightly as it cools, becoming even more sticky and caramelized. Serve the chicken directly from the skillet, spooning the extra glaze over the top for that signature sticky presentation.
For best results, serve immediately with steamed vegetables or a side of jasmine rice to soak up the delicious honey glaze. The combination of caramelized crust, tender meat, and aromatic rosemary makes this dish a standout centerpiece for any meal.
Pro Tips For Making Baked Sticky Chicken Breast
- Pound the Chicken First: Thin the breasts to ½-inch thickness or they’ll dry out faster than you can say "overcooked." I learned this the hard way—my first batch turned into rubbery hockey pucks. Use a rolling pin or meat mallet, then pat dry with paper towels before baking.
- Marinate for 20 Minutes: Don’t skip this—even 20 minutes lets the soy and honey penetrate. I used to toss everything together right before baking, and the glaze would just sit on top like sad, unabsorbed syrup. Use a shallow dish, flip the chicken once, and let it soak while you preheat the oven.
- Bake at 375°F, Not 400°F: Higher heat caramelizes the glaze too fast, leaving the inside undercooked or the outside burnt. I now set my oven to 375°F and bake for 20–25 minutes, checking at 185°F internal temp. The honey needs time to slowly turn sticky, not rush into a burnt mess.
- Add a Splash of Water: Sounds weird, but it works: Pour 2 tablespoons of water into the baking dish before adding the chicken. The steam keeps the glaze glossy and prevents it from drying out mid-bake. I skip this when I’m lazy, but the dish is noticeably better when I don’t—especially if your kitchen is dry.
Perfect pairings for this dish
Classic Side Pairings
Steamed jasmine rice is my go-to side—its delicate, floral aroma complements the sweet-savory glaze beautifully. I like to cook 1 cup uncooked rice with 1.5 cups water and a pinch of salt, then fluff with a fork. For extra flair, stir in 1 teaspoon toasted sesame seeds before serving. 🍚
Roasted seasonal vegetables add vibrant color and texture contrast. Try broccoli and carrots tossed in 1 tbsp olive oil, ½ tsp salt, and ¼ tsp black pepper, then roasted at 400°F for 20 minutes. The natural sweetness of the veggies enhances the honey glaze's richness.
Sauce Enhancements
Drizzle with chili crisp for a spicy kick—I like Lao Gan Ma brand. Start with 1 tsp and adjust to taste. The heat cuts through the sweetness while adding depth. For a tangy twist, serve with pickled ginger on the side. 🌶️
For a creamy option, dollop with spicy mayo made by mixing 2 tbsp mayo with ½ tsp sriracha. This adds a cool contrast to the warm, sticky chicken. I also love adding crispy fried shallots on top for crunch.
Beverage Pairings
A crisp green tea like japanese sencha cleanses the palate between bites. The subtle bitterness balances the honey's sweetness perfectly. For a refreshing twist, serve with sparkling water with lemon slices. 💧
For beer lovers, a light lager like Asahi or Peroni works beautifully. The crisp, clean finish complements the dish without overpowering it. A dry white wine like Sauvignon Blanc also pairs well with the honey and rosemary notes.
Garnish Ideas
Fresh cilantro leaves add a bright, herby finish that cuts through the richness. I like to sprinkle them just before serving. For extra flair, add toasted sesame seeds or crushed peanuts for texture contrast.
Lime wedges are a must—I always serve them on the side. A squeeze of fresh lime juice brightens the dish and enhances the overall flavor profile. The acidity balances the sweetness beautifully. 🍋
Nutrition facts
Frequently asked questions
Why does my sticky chicken turn out dry?
Overcooking is the #1 culprit! Use an instant-read thermometer and remove the chicken when it hits 165°F—don't wait for the glaze to fully set. Also, pat the chicken completely dry before marinating and never skip the 5-10 minute rest after baking. This lets juices redistribute instead of leaking out.
Can I make this with chicken thighs instead?
Yes, but adjust the cooking time! Thighs stay juicier longer, so bake at 375°F for 25-30 minutes until internal temp reaches 175°F. The skin will crisp up beautifully with the sticky glaze. Just reduce the marinade time to 15 minutes since thighs absorb flavor faster.
How do I fix a glaze that's too runny?
Simmer the extra glaze in a small saucepan for 3-5 minutes until it thickens. For instant results, mix 1 tsp cornstarch with 1 tbsp water, stir into the glaze, and cook for 1 minute until thickened. If it's still too thin, repeat the process—this creates that perfect sticky texture!
What's the best way to reheat sticky chicken?
Wrap the chicken in foil with a splash of water and reheat at 350°F for 10-12 minutes. For microwave reheating, cover with a damp paper towel and zap for 20-30 seconds. Avoid high heat—it dries out the chicken and makes the glaze grainy. The foil traps steam to keep everything moist.
Can I make this ahead of time?
Cook the chicken completely, then let it cool. Store in an airtight container in the fridge for 3-4 days or freeze for 3 months. Reheat using the foil method above. The glaze actually improves when reheated properly—it becomes even more caramelized and sticky!