
Main Courses
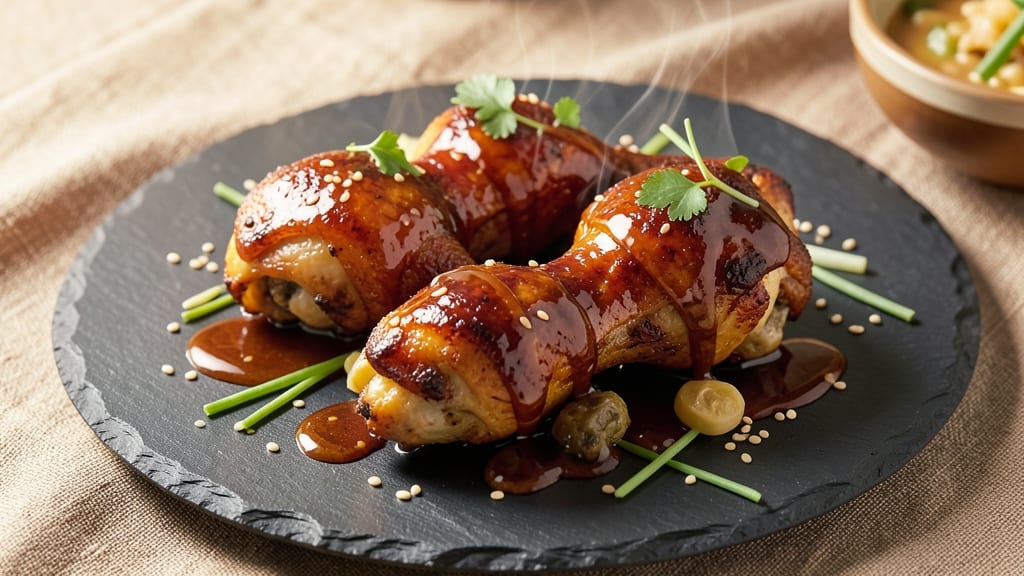
This baked teriyaki chicken legs recipe delivers restaurant-quality results with a glazed caramelized crunch and sticky-sweet shine—no takeout required. After years of perfecting the balance between tender meat and crispy skin, I've cracked the code for juicy, flavor-packed chicken that's foolproof for weeknight dinners.
The secret lies in a homemade teriyaki glaze that caramelizes beautifully in the oven while keeping the chicken irresistibly moist inside.
What sets this recipe apart is the combination of traditional teriyaki flavors with modern baking techniques. We'll use a simple marinade of soy sauce, honey, and garlic that transforms into a rich, glossy glaze when baked.
The high-heat oven method creates that coveted caramelized crust without the mess of stovetop grilling, while the sticky-sweet glaze clings perfectly to every bite. This is comfort food at its finest—simple ingredients that deliver restaurant-quality results.
By the time these golden-brown chicken legs emerge from the oven, you'll have perfectly tender meat with crispy skin and a glossy glaze that's both sweet and savory. The aroma alone will have everyone gathering at the table, and each bite delivers that perfect balance of flavors.
The best part? It's ready in under an hour with minimal hands-on time, making it ideal for busy weeknights or meal prep.
Serve these with steamed rice and roasted vegetables for a complete meal, or pair them with fresh salad for a lighter option. The glaze is so flavorful, you might find yourself licking the plate clean—trust me, I've tested this recipe enough to know.
Let's get started on creating your new favorite weeknight dinner!
Ingredients for baked teriyaki chicken legs
Simple pantry staples transform into restaurant-style teriyaki chicken legs with crispy skin and sticky glaze.
| Ingredient | Amount | Notes |
|---|---|---|
| Chicken Legs 🍗 | 1 ½ lb | Bone-in, skin-on, similar size |
| Soy Sauce 🥢 | ½ cup | Low-sodium preferred |
| Honey 🍯 | ¼ cup | Pure, not imitation |
| Garlic Cloves 🧄 | 6 cloves | Minced, fresh preferred |
| Ginger Root 🌿 | 1 tbsp | Freshly grated |
| Sesame Oil 🫒 | 1 tbsp | Toasted, for aroma |
| Brown Sugar 🍚 | 2 tbsp | Light or dark |
| Cornstarch 🌾 | 1 tbsp | For glaze thickening |
| Olive Oil 🫒 | 1 tbsp | For greasing pan |
| Salt 🧂 | 1 tsp | Kosher or sea salt |
| Black Pepper 🌶️ | ½ tsp | Freshly ground |
| Sesame Seeds 🌾 | 1 tbsp | Toasted, for garnish |
| Green Onions 🧅 | 2 whole | Sliced, for garnish |
The chicken legs make all the difference here. Bone-in, skin-on is non-negotiable for that crispy skin and juicy meat. I always grab the drumsticks and thighs at Costco when they're on sale—they're big enough for hearty portions. If you're buying smaller legs, just add an extra one or two to the pound. The secret to even cooking? Pat them dry with paper towels before marinating. Trader Joe's sells pre-cut legs that work perfectly if you're short on time. Look for legs with good marbling—they'll stay juicier when baked.
No honey? Maple syrup or agave nectar works in a pinch, though honey gives that authentic teriyaki depth. Fresh ginger and garlic are ideal, but dried ginger at half the amount and jarred minced garlic will do. Sesame oil adds that signature aroma—skip it if you're sensitive to strong flavors, but don't skip the toasted sesame seeds on top. The cornstarch is key for that glossy glaze. Bob's Red Mill cornstarch is my go-to, but any brand works. For extra richness, add a splash of rice vinegar to the marinade.
Marinate the chicken for at least 30 minutes—overnight is even better. The glaze keeps for 3 days in the fridge, so make extra for stir-fries or drizzling over rice. Store leftover chicken in an airtight container for 4 days. Freeze cooked chicken for 3 months—thaw overnight in the fridge. Pro tip: Save the leftover glaze for brushing on grilled veggies or tofu. It's that good.
Why You'll Love This Recipe
- One-Pan Magic: I swear by this recipe—just toss the chicken legs, sauce, and spices on a sheet pan, then forget about it. No pots, no pans, no stress. The honey caramelizes into a sticky glaze while the soy and ginger work their flavor magic right in the oven.
- Sweet-Savory Balance: That first bite? The crispy skin gives way to tender meat drenched in a glossy, tangy-sweet sauce—garlic and ginger cut through the richness like a perfect contrast. It’s the kind of dish that makes you pause mid-bite, even when you’re in a hurry.
- Lunchbox Hero: Between us, these are my go-to for meal prep. The leftovers stay juicy for days, and they reheat like a dream—whether I’m packing for work or throwing together a quick lunch. Honestly, I’ve sent these to my kid’s school and my book club, and no one’s ever complained.
- Budget Win: Chicken legs are my secret weapon for feeding a crowd without breaking the bank. A few bucks gets me enough for dinner plus leftovers, and the sauce costs pennies. Plus, the flavors are so rich, you’d never guess it’s not some fancy restaurant dish.
Step-by-step instructions for baked teriyaki chicken legs
Here's how to achieve that perfect balance of caramelized crispiness and sticky-sweet glaze.
Prepare the Chicken Legs for Maximum Flavor
Preheat your oven to 400°F while you prepare the chicken. Pat the 1.5 lb chicken legs completely dry with paper towels—this step is crucial for crispy skin. I like to use a clean kitchen towel and really press down to remove all moisture, especially around the joints and skin folds.
In a small bowl, mix together 1 tbsp olive oil, 1 tsp salt, and 0.5 tsp black pepper. Rub this mixture all over the chicken legs, making sure to get it under the skin as well. The oil helps create that beautiful caramelization while the salt and pepper season it thoroughly. Let the chicken sit at room temperature for 15 minutes before baking—this ensures even cooking and better browning.
Create the Sticky-Sweet Teriyaki Glaze
In a medium saucepan, combine 0.5 cup soy sauce, 0.25 cup honey, 2 tbsp brown sugar, 6 cloves minced garlic, and 1 tbsp freshly grated ginger root. Bring this mixture to a gentle simmer over medium heat, stirring occasionally to dissolve the sugar. Let it cook for 5 minutes until slightly thickened and fragrant.
In a small bowl, whisk together 1 tbsp cornstarch with 2 tablespoons water to make a slurry. Slowly pour this into the simmering sauce while stirring constantly. The mixture will thicken dramatically—keep stirring for another 2-3 minutes until it reaches a glossy, syrupy consistency that coats the back of a spoon. Remove from heat and stir in 1 tbsp sesame oil for that authentic aroma.
Bake the Chicken for Crispy Perfection
Place the seasoned chicken legs on a wire rack set inside a baking sheet. This rack position allows air to circulate underneath, creating that coveted crispy skin. Bake for 45 minutes, flipping the chicken halfway through at the 22-minute mark. You'll know it's time to flip when the skin starts to brown and pull away slightly from the meat.
After flipping, continue baking for another 20-25 minutes until the skin is deep golden brown and crispy, and the internal temperature reaches 165°F in the thickest part of the meat. The chicken should be juicy inside with that irresistible crunch on the outside. If the skin starts browning too quickly, tent loosely with foil to prevent burning.
Glaze and Garnish for Maximum Appeal
Remove the chicken from the oven and transfer it to a serving platter. Spoon about 2/3 of the teriyaki glaze over the chicken legs, letting it pool in the bottom of the pan to create that signature sticky finish. Return the chicken to the oven for 3-5 minutes to let the glaze caramelize slightly and coat the meat.
While the chicken finishes glazing, slice the 2 whole green onions into thin rounds and toast the 1 tbsp sesame seeds in a dry skillet over medium heat for 1 minute until fragrant. Sprinkle the toasted sesame seeds and sliced green onions over the glazed chicken legs. The seeds add a nutty crunch while the green onions provide a fresh contrast to the rich flavors.
Rest and Serve with Sticky-Sweet Shine
Let the chicken rest for 5 minutes before serving—this allows the juices to redistribute throughout the meat. The glaze will continue to thicken slightly as it cools, creating that perfect balance between sticky and caramelized. Serve the chicken legs with any remaining glaze spooned over the top and drizzled around the platter.
Each bite should deliver that satisfying crunch from the crispy skin, followed by juicy chicken and that perfect balance of sweet, salty, and umami flavors from the teriyaki glaze. The combination of toasted sesame seeds and fresh green onions adds texture and freshness that elevates this dish from ordinary to extraordinary. Enjoy immediately while the glaze is still warm and sticky!
Pro Tips For Making Baked Teriyaki Chicken Legs
- CRANK THE OVEN HIGH FIRST: Start your chicken legs at 425°F (220°C) for the first 15 minutes—this sears the skin and locks in flavor before the teriyaki turns into a glaze. I used to bake them at 375°F (190°C) the whole time, and they’d steam instead of caramelize. The skin stays crispy, and the sauce doesn’t just pool at the bottom.
- GRATE THE GINGER FINE: Skip the mincer and grate the ginger with a microplane—you’ll get way more surface area and none of that chewy texture that ruins the sauce. I learned this the hard way after biting into a chunk mid-bite. A teaspoon of fresh, finely grated ginger makes a real difference compared to pre-minced or powdered.
- BRINE THE CHICKEN LEGS: Toss the chicken legs in a mix of 1 cup water, 1 tablespoon soy sauce, and 1 teaspoon salt for 30 minutes before baking. This keeps them juicy even with the long cook time, and the teriyaki sauce clings better. I skip this when I’m lazy, but the dish is noticeably better when I don’t.
- USE A THICKENED SAUCE: Mix 1 tablespoon cornstarch with 2 tablespoons water and stir it into your teriyaki sauce before glazing the chicken. The sauce won’t pool on the tray or drip off the legs like it does when you just toss everything together. It’ll coat evenly and give you that sticky, restaurant-quality finish.
Best sauces and condiments for this dish
Classic Teriyaki Glaze
This homemade teriyaki glaze is the star of the show—sweet, salty, and umami-packed with just the right balance. I start with ½ cup soy sauce (low-sodium preferred) and ¼ cup pure honey for that authentic depth.
The 2 tbsp brown sugar and 6 minced garlic cloves create the perfect caramelization when baked, while 1 tbsp freshly grated ginger adds a zesty kick. The secret? A cornstarch slurry thickens it beautifully for that glossy finish. 🍯
Spicy Sesame Kick
For a flavor twist, add 1 tsp gochujang (Korean chili paste) or ½ tsp red pepper flakes to the glaze for heat. I also like to finish with 1 tbsp toasted sesame seeds and 2 tbsp chopped scallions for texture.
The sesame oil in the glaze gives it that signature aroma—don’t skip it! If you’re sensitive to strong flavors, reduce the sesame oil to ½ tbsp but keep the seeds for crunch.
Honey-Glazed Variations
Swap the honey for ¼ cup maple syrup or agave nectar for a vegan-friendly option. For extra richness, add 1 tbsp rice vinegar to brighten the flavors. My grandmother used to drizzle a touch of mirin (sweet rice wine) into her glaze—it adds a subtle sweetness without overpowering.
Keep the glaze ratio balanced: 1 part vinegar to 3 parts honey for best results.
Extra Glaze Uses
Make extra glaze—it’s perfect for brushing on grilled veggies, tofu, or even drizzling over rice. Store leftover glaze in an airtight container in the fridge for up to 3 days.
For a quick stir-fry, toss 1 lb chicken breast with 2 tbsp glaze and cook over high heat for 5-6 minutes. The glaze also works as a marinade for shrimp or pork chops—just reduce the cornstarch to ½ tbsp for a thinner consistency.
Sweet and Tangy Twist
Add 1 tbsp orange zest and 2 tbsp orange juice to the glaze for a citrusy brightness. The acidity cuts through the richness, making each bite refreshing. I also like to finish with a sprinkle of crushed peanuts for extra crunch.
For a smoky flavor, add ½ tsp smoked paprika to the marinade before baking. The combination of sweet, tangy, and smoky is pure comfort food magic. 🍊
Nutrition facts
Frequently asked questions
Can I use chicken thighs instead of drumsticks?
Chicken thighs work beautifully in this recipe—they're even more forgiving and stay juicier. Use the same weight (1.5 lb) and follow the same baking time. The skin on thighs is often thicker, so you might want to flip them slightly earlier (around 20 minutes instead of 22 minutes) to prevent over-browning.
What if my teriyaki glaze isn't thick enough?
Simmer the glaze uncovered for 2-3 extra minutes to reduce it further. If it's still too thin, mix ½ tsp cornstarch with 1 tsp water and stir it in while the glaze is hot. For a quick fix, whisk in 1 tsp honey to help thicken it naturally. The glaze should coat the back of a spoon smoothly.
How do I keep the chicken from drying out?
Never skip patting the chicken dry before seasoning—this ensures crispy skin, not soggy. Use a wire rack in your baking sheet to allow air circulation underneath. Bake at 400°F (not higher) and check the internal temperature with a meat thermometer—remove at 160°F and let it rest 5 minutes before serving. This resting time lets juices redistribute.
Can I make this recipe in an air fryer?
Yes! Preheat your air fryer to 375°F and cook the chicken for 20 minutes, flipping halfway. Brush with 1 tbsp glaze after 10 minutes, then finish with another 5 minutes to caramelize. The air fryer creates crispy skin faster, so watch closely after 15 minutes to prevent burning.
What's the best way to reheat leftovers?
Reheat in a 350°F oven for 10-12 minutes with 1 tbsp water in the pan to keep the glaze moist. For microwave reheating, cover with a damp paper towel and heat for 45-60 seconds. The skin won't be as crispy as fresh, but the flavors stay delicious. Store leftovers in an airtight container for 4 days.