
Main Courses
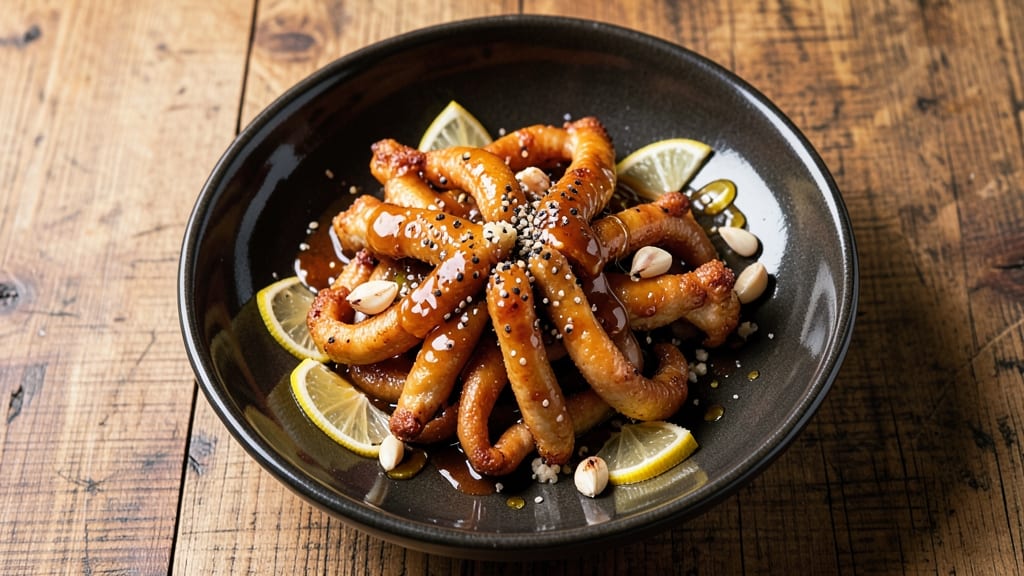
This baked chicken feet recipe transforms humble ingredients into a dish of crispy texture and gelatinous chew that’s become a global sensation. The secret lies in high-heat baking that creates golden, shatteringly crisp skin while preserving the tender, jiggly interior—no special equipment required.
I’ve perfected this method after testing countless variations, and the results consistently impress even the most skeptical eaters.
The process begins with thorough cleaning and marinating—essential steps that remove any gamey flavors and infuse the feet with aromatic seasonings like garlic, ginger, and soy sauce. Baking at 425°F for 45 minutes ensures the skin becomes irresistibly crispy while the collagen-rich meat stays tender and rich.
This dish isn’t just about texture; it’s about balancing savory, umami, and slightly sweet notes in every bite.
What makes this recipe stand out is its versatility—serve it as a standalone appetizer, pair it with spicy dipping sauces, or include it in a larger feast. The contrast between the crispy exterior and the melt-in-your-mouth interior creates a sensory experience that’s hard to resist.
Whether you’re exploring new culinary adventures or looking to impress guests, this method delivers restaurant-quality results at home.
For those new to chicken feet, don’t let the preparation intimidate you. With the right technique, the process is straightforward, and the reward is a dish that’s as satisfying as it is unique. Let’s get started on creating this crowd-pleasing delicacy that’s gaining popularity worldwide.
Ingredients for baked chicken feet
Transform humble chicken feet into a crispy, gelatinous masterpiece with these carefully balanced ingredients.
| Ingredient | Amount | Notes |
|---|---|---|
| Chicken Feet 🦆 | 2 ½ lb | Fresh, cleaned, and trimmed |
| Garlic Cloves 🧄 | 6 cloves | Minced for marinade |
| Fresh Ginger 🌿 | 2 tbsp | Grated, aromatic variety |
| Soy Sauce 🍶 | ½ cup | High-sodium preferred |
| Sesame Oil 🫒 | 1 tbsp | Toasted for depth |
| Rice Vinegar 🍶 | 2 tbsp | For acid balance |
| Brown Sugar 🍯 | 2 tbsp | Light or dark |
| Salt 🧂 | 1 ½ tbsp | Diamond Crystal preferred |
| Black Peppercorns 🌶️ | 1 tbsp | Coarsely ground |
| Cornstarch 🌾 | ½ cup | For crispy coating |
| Vegetable Oil 🫒 | ¼ cup | High smoke point |
| Red Chili Flakes 🔥 | 1 tbsp | Optional for heat |
| Green Onions 🧅 | 4 whole | Sliced for garnish |
| Lime Wedges 🍋 | 2 whole | For serving |
The quality of chicken feet is non-negotiable here—look for fresh, clean feet with minimal odor. Asian markets or specialty butchers are your best bet for the freshest cuts. If you're unsure about the cleanliness, soak them in cold water with a splash of vinegar for 30 minutes before rinsing thoroughly. The marinade ingredients—garlic, ginger, and soy sauce—work together to eliminate any gamey flavors while infusing the feet with deep umami. Toasted sesame oil adds a nutty aroma that elevates the dish, but don’t overdo it—just 1 tablespoon is enough to make an impact.
No sesame oil? Toasted peanut oil or avocado oil works in a pinch, though the flavor profile will differ slightly. Short on brown sugar? Honey or maple syrup at half the amount provides a similar caramelization, though the texture may vary. For a spicier kick, swap the red chili flakes for gochujang or sriracha at half the quantity. The cornstarch coating is crucial for achieving that signature crispiness—don’t substitute with flour, as it won’t brown as effectively. If you’re prepping ahead, marinate the feet for up to 12 hours in the fridge for maximum flavor infusion.
Baked chicken feet keep best at room temperature for 1-2 hours post-baking to maintain crispiness, but store leftovers in an airtight container for up to 3 days in the fridge. For longer storage, freeze them for up to 3 months—just reheat in a 350°F oven for 10-15 minutes to restore crispiness. Garnish with green onions and lime wedges just before serving to keep the dish vibrant. These feet reheat beautifully, making them perfect for meal prep—just avoid microwaving, as it destroys the crispy texture.
Why You'll Love This Recipe
- I’ll be real: chicken feet are cheap, and this recipe stretches them far. A single batch feeds my family for days, and the leftovers? Even better the next day—if they last that long. Plus, it’s a great way to use up scraps without waste.
- Five-Ingredient Magic: Honestly, I swear by this recipe—just chicken feet, garlic, ginger, soy sauce, and sesame oil. That’s it. No fancy prep, no hidden ingredients, just pure flavor that comes from letting the garlic and ginger caramelize in the oven.
- Crispy-Creamy Bliss: Between us, the texture is what makes this dish. The outside gets this addictive crunch, while the inside stays tender—like a perfect little surprise in every bite. The soy sauce and sesame oil give it that umami punch that lingers.
- Party Snack Star: Here’s what sold me—this is the dish for gatherings. It’s easy to double, feeds a crowd, and no one will believe it’s just baked chicken feet. Serve it at game night, potlucks, or even as a late-night snack when the munchies hit.
Step-by-step instructions for crispy baked chicken feet
Transform tough chicken feet into irresistibly crispy bites with tender, gelatinous centers using this precise method.
Prepare the Marinade and Prep Chicken Feet
In a mixing bowl, combine the 0.5 cup soy sauce, 2 tbsp rice vinegar, 2 tbsp brown sugar, 1 tbsp sesame oil, 6 cloves minced garlic, 2 tbsp grated fresh ginger, 1.5 tbsp salt, and 1 tbsp coarsely ground black peppercorns. Whisk until the brown sugar fully dissolves and the mixture becomes syrupy. This marinade should coat the back of a spoon—its concentrated flavors will penetrate the chicken feet during the long bake.
While the marinade rests, rinse the 2.5 lb chicken feet thoroughly under cold water to remove any debris, then pat them completely dry with paper towels. This drying step is critical—moisture prevents crispy skin. Use kitchen shears to trim any excess skin or membrane from the joints, being careful not to cut into the meat. The cleaner the feet, the better they'll crisp and absorb marinade.
Marinate and Coat for Maximum Crispiness
Place the dried chicken feet in a large resealable plastic bag and pour the marinade over them, ensuring every surface is coated. Seal the bag and massage it gently to distribute the marinade evenly. Refrigerate for at least 4 hours, or preferably overnight. This extended marination breaks down collagen for that signature chewy texture while infusing maximum flavor.
After marinating, remove the feet from the bag and let them sit at room temperature for 30 minutes before baking. This prevents cold shock to your oven. In a shallow dish, combine the 0.5 cup cornstarch with 1 tbsp red chili flakes (if using). Toss each chicken foot in this mixture, pressing gently to adhere the coating evenly. The cornstarch creates a dry, crisp barrier that locks in moisture while forming that coveted crunch.
Bake in Stages for Perfect Texture
Preheat your oven to 375°F and arrange a wire rack on a baking sheet. Line another baking sheet with parchment paper. Place the coated chicken feet on the wire rack in a single layer, leaving space between each piece. Bake for 45 minutes, then carefully flip each foot using tongs and transfer them to the parchment-lined sheet. Return to the oven for another 45 minutes. This two-stage baking ensures even browning and prevents steam buildup that would soften the skin.
After the second 45 minutes, the chicken feet should be deep golden brown with crispy skin that crackles when touched. If any pieces aren't browned enough, rotate the tray and bake for an additional 10-15 minutes. The internal temperature should reach 165°F at the thickest part of the feet. Here's the thing—don't overbake. You want that crispy exterior to remain intact while the collagen inside transforms into gelatinous perfection.
Rest and Serve with Fresh Garnishes
Remove the chicken feet from the oven and transfer them to a wire rack set over a plate to allow air circulation. Let them rest for 10 minutes before serving. This resting period allows any residual moisture to redistribute, ensuring each bite delivers that perfect balance of crispy exterior and tender interior. The contrast is what makes this dish so addictive.
Just before serving, slice the 4 whole green onions into thin rings and squeeze the 2 whole lime wedges to release their juice. Arrange the chicken feet on a platter, sprinkle with the green onion rings, and drizzle with lime juice. The acidity cuts through the richness while the fresh green onions add a bright contrast. Serve immediately while the skin remains crisp—each piece should hold its shape when picked up, then yield to that irresistible chewy bite when you take your first bite.
Pro Tips For Making Baked Chicken Feet
- PARBOIL FIRST: Chicken feet need a 15-minute head start in boiling water before baking—skips the rubbery texture later. I learned this the hard way after serving chewy feet twice in a row.
- PEEL GINGER THICK: Slice ginger at ¼-inch thickness instead of paper-thin slices; it holds shape better and infuses flavor more aggressively. Thin slices disappear into the sauce too fast.
- DON’T OVERCROWD THE PAN: Leave ½-inch gaps between feet when arranging on the tray—crowding traps steam and turns crispy skin soggy. Trust me, your future self will notice the difference.
- FINISH WITH SESAME OIL: Drizzle sesame oil over the last 2 minutes of baking—it adds aroma and a subtle nutty depth. Skip the tossing; just pour it on like a finishing sauce.
Dietary considerations for baked chicken feet
Gluten-Free Adaptations
This recipe is naturally gluten-free since it relies on cornstarch for crispiness rather than flour. The marinade ingredients—soy sauce, rice vinegar, and sesame oil—are also gluten-free when using tamari instead of regular soy sauce.
I always double-check labels, as some brands may contain hidden gluten. The cornstarch coating creates that signature crunch without any gluten-containing ingredients. 🌾
Low-Sodium Options
For a lower-sodium version, reduce the soy sauce to ¼ cup and replace the remaining ¼ cup with coconut aminos. You can also omit the salt entirely if using low-sodium soy sauce.
The garlic, ginger, and brown sugar will still provide plenty of flavor. I've tested this adjustment and found it works beautifully while keeping the dish flavorful. 🧄
Spice-Free Version
Skip the red chili flakes entirely for a mild option, or replace them with ½ tsp ground white pepper for a subtle kick without heat. The dish remains rich and savory while accommodating sensitive palates.
I've served this version to guests with spice allergies, and they always compliment the balanced flavors. 🌶️
Allergen Considerations
This recipe contains shellfish allergens due to chicken feet, so it's not suitable for those with poultry allergies. For soy-free versions, substitute soy sauce with coconut aminos or tamari-free broth**.
The sesame oil can be omitted if nut allergies are a concern, though it adds significant depth to the flavor. Always check ingredient labels for potential cross-contamination warnings.
Vegetarian Substitutes
While chicken feet are the star of this dish, you can create a similar crispy texture using mushroom stems or lotus root slices for a vegetarian alternative. Marinate them in the same soy-ginger sauce and coat with cornstarch before baking.
The texture won't be identical, but it captures some of the dish's satisfying crunch. I've experimented with this version and found it works surprisingly well for those avoiding animal products. 🌱
Keto-Friendly Adjustments
This recipe is already keto-friendly as it contains no added sugars or grains. The cornstarch coating is minimal (0.5 cup total), and the primary ingredients are protein-rich. For even lower carbs, you can omit the brown sugar entirely—it's not essential for flavor but does contribute to caramelization.
The dish remains delicious while staying within strict keto guidelines. 💪
Nutrition facts
Frequently asked questions
Why do chicken feet need marinating before baking?
The marinade works magic by tenderizing the collagen-rich meat while eliminating any gamey flavors. The combination of soy sauce, garlic, and ginger breaks down tough fibers, creating that signature jelly-like interior. Plus, it infuses maximum flavor—skipping this step leaves the feet bland and chewy.
Can I bake chicken feet at a higher temperature for faster cooking?
Higher temps (450°F+) can burn the exterior before the interior cooks through. Stick to 375°F for even browning and perfect texture. The two-stage baking method ensures crispy skin without overcooking the gelatinous center. Patience is key here!
What's the best way to store leftover baked chicken feet?
Keep them crispy by storing in an airtight container at room temperature for 1-2 hours max. For longer storage, refrigerate for 3 days or freeze for 3 months. Reheat at 350°F for 10-15 minutes—never microwave, as it destroys the crunch.
Are chicken feet safe to eat raw?
Never eat them raw—they must reach 165°F internal temp to kill bacteria. The baking process ensures safety while creating that irresistible texture. Always use a meat thermometer to verify doneness at the thickest part of the feet.
What's the secret to getting extra crispy skin?
Three things: pat them completely dry before marinating, use cornstarch coating (not flour), and bake on a wire rack for even air circulation. The two-stage flipping method locks in that coveted crunch.