
Main Courses
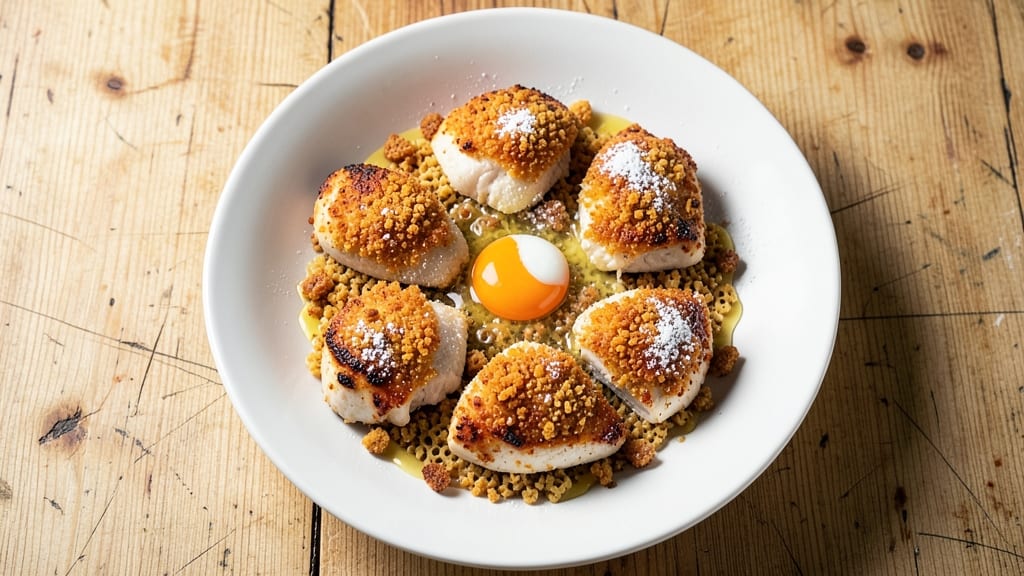
This baked chicken breast with Ritz crackers recipe transforms ordinary weeknight dinner into something special—crispy cracker crowns holding together tender, juicy chicken that practically melts in your mouth.
After years of experimenting with breading techniques, I discovered the perfect balance: buttery Ritz crackers create a golden, shatteringly crispy crust that contrasts beautifully with the moist chicken inside. The secret? A simple marinade and the right baking temperature to ensure perfect doneness every time.
The beauty of this recipe lies in its simplicity—no fancy ingredients or complicated techniques required. You'll start with boneless chicken breasts, pounded to an even thickness for consistent cooking, then coat them in a mixture of crushed Ritz crackers and seasoned breadcrumbs.
The crackers add a buttery, slightly sweet crunch that pairs perfectly with the savory chicken. My grandmother used to make chicken this way, though she always relied on her intuition rather than measurements. I've refined her method to ensure foolproof results even for beginners.
By the time it emerges from the oven, you'll have perfectly golden chicken with cracker crowns that stay crispy, not soggy. The inside remains juicy and tender, with no hint of dryness. This dish works beautifully as a standalone meal or paired with roasted vegetables and a simple salad.
The cracker topping also makes it a crowd-pleaser—everyone loves the satisfying crunch and melty pull-apart texture.
What makes this recipe truly special is how it elevates a basic protein into something restaurant-worthy with minimal effort. The Ritz crackers add a nostalgic, comforting element that reminds me of my grandmother's kitchen, where simple ingredients always delivered extraordinary results.
Let's get started—this dish is easier to make than you'd think, and the payoff is absolutely worth it.
Ingredients for baked chicken breast ritz crackers
Buttery cracker crowns and juicy chicken—this recipe delivers restaurant-quality magic with pantry staples.
| Ingredient | Amount | Notes |
|---|---|---|
| Boneless, Skinless Chicken Breasts 🍗 | 1 ½ lb | Pounded to even 1/2-inch thickness |
| Ritz Crackers 🍞 | 1 ½ cups | Original flavor, crushed into fine crumbs |
| Panko Breadcrumbs 🍞 | ½ cup | For extra crispiness |
| Unsalted Butter 🧈 | ¼ cup | Melted, for cracker mixture |
| All-Purpose Flour 🌾 | ¼ cup | For light coating |
| Large Eggs 🥚 | 2 whole | Beaten for egg wash |
| Granulated Garlic Powder 🧄 | 1 tbsp | For seasoning |
| Onion Powder 🧅 | 1 tbsp | For seasoning |
| Paprika 🌶️ | 1 tsp | Smoked for color |
| Ground Black Pepper 🌶️ | ½ tsp | Freshly cracked |
| Kosher Salt 🧂 | 1 tsp | For seasoning |
| Olive Oil 🫒 | 2 tbsp | For greasing baking dish |
| Lemon Juice 🍋 | 2 tbsp | Freshly squeezed |
The Ritz crackers are non-negotiable here—their buttery, slightly sweet flavor creates that perfect crunch. Grab the original flavor from any grocery store (the blue box is easiest to crush), but avoid the salted version—we're controlling the seasoning ourselves. For extra crispiness, I always mix in panko breadcrumbs at a 2:1 ratio with the Ritz. Trader Joe's sells pre-crushed Ritz in the baking aisle if you're short on time, but trust me, crushing them fresh makes all the difference. The chicken breasts should be even thickness—pound them between plastic wrap to 1/2-inch for consistent cooking. Costco sells chicken breasts in bulk that are perfect for this recipe.
No Ritz crackers? Buttery saltines or graham crackers work in a pinch, but the flavor won't be quite the same. Short on panko? Crushed cornflakes give a similar texture (though less crispy). The lemon juice is essential—it keeps the chicken tender while adding brightness. Freshly cracked black pepper makes a world of difference compared to pre-ground, so if you've got a pepper mill, use it. For the butter in the cracker mixture, don't skip the melting step—it creates that golden, shatteringly crispy crust. The olive oil in the baking dish prevents sticking, so don't skimp on the greasing. Pro tip: Line your baking sheet with parchment paper for easy cleanup.
Chicken stays juicy for 3 days in the fridge when stored in an airtight container with a paper towel underneath to absorb moisture. Freeze for up to 3 months by wrapping tightly in foil and plastic wrap. The cracker topping stays crispy when reheated—just 10 minutes at 350°F in the oven. I always make a double batch because this dish disappears fast. Leftovers reheat beautifully—just cover with foil for the first 5 minutes to prevent over-crisping, then uncover to crisp up the crowns again.
Why You'll Love This Recipe
- No-Fuss Crunch: The Ritz crackers and panko combo gives this a satisfying crunch without the fuss of frying—just toss, press, bake. Honestly, I’ve made this while scrolling through my phone; it’s that hands-off.
- Hidden Flavor Bomb: That buttery Ritz crumble and crispy panko edge? It’s like a grown-up chicken finger, but better. The flour-dredged chicken stays juicy inside, and the crackers add this weirdly addictive saltiness.
- Game for Any Meal: Pack these for lunches—cold or reheated, they’re still solid. Or serve at a potluck where everyone thinks you slaved over it. (Between us, it’s 20 minutes of work.)
- Pantry Magic: Uses stuff you already own—no specialty ingredients, no last-minute grocery runs. Leftover chicken? Toss it in here. Extra Ritz? Use them up. It’s the kind of recipe that turns scraps into something people actually ask for.
Step-by-step instructions for baked chicken breast with Ritz crackers
Transform simple chicken breasts into a showstopping dish with crispy cracker crowns and juicy centers.
Prepare the Chicken and Seasoning
Start by pounding the 1.5 lb boneless, skinless chicken breasts to an even ½-inch thickness between two sheets of plastic wrap using a meat mallet. This ensures even cooking and prevents dryness. Place the pounded breasts in a bowl and season generously with 1 tbsp granulated garlic powder, 1 tbsp onion powder, 1 tsp paprika, ½ tsp ground black pepper, and 1 tsp kosher salt. Mix well so the seasoning clings to every surface—this is where all the flavor begins.
Let the seasoned chicken rest for 10 minutes at room temperature. This brief pause allows the seasoning to penetrate slightly and ensures more even cooking. While you wait, preheat your oven to 375°F—this temperature guarantees crispy crackers without overcooking the chicken.
Create the Crispy Cracker Crown Mixture
In a separate bowl, combine the 1.5 cups crushed Ritz crackers, ½ cup panko breadcrumbs, and ¼ cup melted unsalted butter. The Ritz crackers should be finely crushed—think breadcrumbs consistency—for maximum surface area and crunch. Mix thoroughly until the butter is evenly distributed and the mixture resembles wet sand. This is your crown topping, so don't skimp on the butter—it's what creates that irresistible golden crunch.
Set aside ¼ cup all-purpose flour for dredging and crack an extra large egg into a shallow dish. The beaten egg will act as a glue between the chicken and cracker crown, ensuring everything stays perfectly in place during baking. Here's the thing—don't rush this prep. Properly coating the chicken now means effortless assembly later.
Assemble and Bake the Chicken Crowns
Lightly grease a 9x13-inch baking dish with 2 tbsp olive oil—this prevents sticking and makes cleanup a breeze. Working with one piece at a time, dredge each seasoned chicken breast in the ¼ cup all-purpose flour, shaking off any excess. Then dip into the beaten egg, letting any excess drip off before pressing firmly into the cracker mixture. The goal is complete, even coverage—press especially well along the edges where the crown meets the chicken.
Arrange the coated chicken breasts in the prepared baking dish, standing them upright like little crowns. This vertical position creates maximum surface area for the cracker mixture to crisp perfectly. Bake for 25-30 minutes until the chicken reaches an internal temperature of 165°F and the cracker crowns are deep golden brown. The chicken should be tender enough to pull apart easily with a fork, while the crackers should shatter with every bite.
Finish with Lemon and Serve Immediately
Remove the baking dish from the oven and immediately drizzle each chicken crown with 1 tbsp lemon juice—this bright citrus note cuts through the richness of the butter and crackers while adding a fresh finish. Let the chicken rest for 5 minutes before serving, though I know it's tempting to dive in immediately. This brief rest allows the juices to redistribute, ensuring each bite is as moist as it is crispy.
Serve the chicken crowns with a side of roasted vegetables or a fresh salad to balance the richness. The contrast of warm, melty chicken with the crispy cracker crowns creates the ultimate pull-apart texture that makes this dish so irresistible. And here's my pro tip: if you're feeling fancy, garnish with extra crushed crackers before serving for that restaurant-quality presentation.
Pro Tips For Making Baked Chicken Breast Ritz Crackers
- CRUSH THE CRACKERS FIRST: I used to toss Ritz crackers straight into the food processor and wonder why my coating felt like sandpaper. Pulse them in batches until they’re fine crumbs—think breadcrumbs, not gravel. This makes the coating stick better and gives you that perfect, even texture.
- SALT THE CHICKEN BEFORE DREDGING: Season the chicken breasts with salt before dredging in flour. I learned this the hard way—if you salt after, the coating absorbs moisture and turns to paste. A pinch of salt on the meat means the crust stays crispy, not soggy.
- USE COLD BUTTER FOR CRUST: Grate that unsalted butter cold and mix it into the cracker-panko-flour combo. Warm butter melts too fast, turning your crust into a sad, greasy mess. Cold butter adds richness without sacrificing crunch—trust me, your bite will thank you.
- BAKE TWO AT A TIME: Resist the urge to crowd the pan. Bake the chicken breasts in two separate batches if needed—this ensures even browning and prevents steaming, which turns your cracker crust into a sad, limp blanket. A hot oven (400°F) and space to breathe = crispy perfection.
Pro cooking tips for this dish
Even Thickness Matters
Pounding chicken breasts to a consistent ½-inch thickness is non-negotiable for perfect results. I learned this the hard way—uneven thickness means some parts dry out while others stay undercooked. Use a meat mallet or rolling pin between plastic wrap for clean, even strikes.
For thicker breasts, pound the wider sides first, then trim any uneven edges. This step ensures your cracker crowns crisp uniformly all around. 💪
Butter is Key
The ¼ cup melted butter in the cracker mixture makes all the difference—it creates that irresistible golden crunch and rich flavor. Don't substitute oil or margarine; butter's fat content is essential for that shatteringly crisp texture.
Melt it gently over low heat or in the microwave (just 30 seconds) until completely liquid but not browned. The butter should coat the crackers evenly, almost like wet sand. If your mixture looks dry, add a splash of milk to bind it.
Pro Breading Technique
For that perfect pull-apart texture, follow this order: flour → egg → cracker mixture. Start with a light flour dredge to create a barrier between the chicken and egg. Then dip into the beaten egg, letting excess drip off completely before pressing into the cracker crown.
Press firmly, especially along the edges, to ensure the crackers stick. I like to use my fingers to shape the crowns slightly—this creates those beautiful, uneven peaks that look so impressive. The egg acts as glue, but don't over-saturate the chicken or your crowns will fall apart during baking. ✨
Vertical Baking Hack
Arranging the chicken breasts vertically in the baking dish is my secret weapon for perfect cracker crowns. This position maximizes surface area, allowing the crackers to crisp evenly on all sides. Stand them upright like little towers, leaving about ½ inch between each piece.
This also helps the crowns maintain their shape during baking. For extra insurance, I sometimes place a small piece of foil under each breast to prevent any potential sticking to the baking dish. The vertical position also makes them look stunning when plated—like edible crowns fit for a king. 👑
Internal Temp Check
Use a meat thermometer to check for doneness—165°F at the thickest part is the magic number. I know some cooks rely on visual cues, but chicken can look cooked on the outside while staying underdone inside.
Insert the thermometer horizontally into the thickest part of the breast, avoiding the bone if present. The cracker crowns should be deep golden brown with no white spots. If they're browning too quickly, tent loosely with foil to prevent burning while the chicken finishes cooking.
This is where patience pays off—don't rush it! 🌡️
Lemon Finish
That final drizzle of lemon juice is what ties the whole dish together. The bright acidity cuts through the richness of the butter and crackers, balancing all the flavors.
I like to squeeze the juice directly over the hot chicken right out of the oven—this also helps steam the crackers slightly, keeping them extra crispy. For an extra touch, I sometimes add a pinch of freshly cracked black pepper or a sprinkle of chopped parsley right before serving.
This simple step elevates the dish from good to restaurant-quality in seconds. 🍋
Nutrition facts
Frequently asked questions
Why do the cracker crowns sometimes fall off during baking?
The most common reason is too much egg wash or not pressing the cracker mixture firmly enough. Use the flour → egg → cracker sequence and press especially well along the edges. Also ensure your egg isn't too wet—let excess drip off completely before coating. If they still fall apart, try adding 1 tbsp mayonnaise to your cracker mixture for extra binding.
Can I use this recipe with thicker chicken breasts?
Yes, but you'll need to adjust the cooking time. For breasts over 1-inch thick, bake for 35-40 minutes at 375°F until internal temp reaches 165°F. Pound them thinner first to ensure even cooking. Thicker breasts also benefit from a 5-minute rest after pounding to prevent tearing when coating.
What's the best way to reheat leftovers without making the crackers soggy?
Reheat in a 375°F oven for 10-12 minutes on a wire rack set over a baking sheet. The rack allows hot air to circulate, keeping the crackers crispy. For microwave reheating, cover with a paper towel and heat in 20-second bursts, stirring between each. Never use foil—it traps steam and makes everything rubbery.
Can I make this recipe ahead of time?
Assemble the coated chicken crowns up to 24 hours ahead and refrigerate uncovered on a wire rack. This prevents sogginess. When ready to bake, add 5-7 minutes to your baking time (they'll need the extra time cold). For freezing, bake completely first, then cool completely before wrapping tightly in foil and plastic. Reheat from frozen using the oven method above, adding 5-10 extra minutes.
What are some good side dishes to serve with this?
This rich chicken pairs beautifully with lighter, fresh sides. Try roasted asparagus with lemon zest, creamy coleslaw, or a simple arugula salad with balsamic glaze. For something heartier, garlic mashed potatoes or cornbread work wonderfully. The crispy crackers contrast perfectly with cool, creamy textures—think cucumber salad or chilled pea soup**.